Friday, 3 January 2014

Artic Animals

  Walrus Craft

Materials:

  • sheet of black or blue construction paper
  • 1 large and 2 medium sized circles from brown construction paper
  • 1 mall triangular piece from black construction paper(nose)
  • 2 long triangular pieces from white paper(tusks)
  • 2 eye stickers
  • 6 short pieces of brown string(whiskers)
  • scissors
  • glue
  • black marker
  • This can also be done with paper plates rather than construction paper 

  • Directions:

    1. Cut out brown circles. Cut 1 small circle in half to make the flippers.
    2. Glue the body, head, and flippers on the black construction paper.
    3. Add eyes and nose.
    4. Draw a little mouth.
    5. Glue on whiskers and tusks

Polar Bear Arctic Animals Craft for Kids


Materials- For each child, you will need:
  • 1 sheet of light blue construction paper
  • Arctic animal template cutouts   
  • White tempura paint
  • A toothbrush

Directions:
1. Place bear, rabbit, and fox templates on light blue construction paper.
2. Dip toothbrush into the white paint and flicking your thumb, splatter the white paint all around the edge of the cutouts. (The paint shouldn’t be too thick or it won’t splatter. Dilute with a little water as necessary.)
3. Remove templates and allow to dry.

The end effect is really cool. The silhouettes give the impression of watching the animals walking through a snowstorm. You could try the same concept with dessert animals through a sandstorm. Let you imagination go wild.

Polar Bear Cup Puppet Craft

8

This is an adorable  and easy polar bear puppet craft you can make from a Styrofoam cup and some paper. The paper pieces don't have to be exact circles. It's probable better if they're not. A little oblong or diamond shaped is ok.
Materials:
  • 1 large Styrofoam cup
  • 1 large paper circle(head)
  • 2 tiny white circles(ears)
  • 1 medium Styrofoam circle(nose and mouth piece)
  • 1 small black circle(nose)
  • 2 curved rectangle shapes(arms)
  • 2 google eyes
  • black marker
  • glue
  • scissors
Directions:
  1. Glue the ears, nose and mouth pieces, and google eyes on the head circle as shown.
  2. Draw a mouth on the Styrofoam piece.
  3. Glue the head to the front of the Styrofoam cup.
  4. Glue the arm pieces on the sides, sticking out. Add claws if desired.

 Pinecone Snowy Owl


All you need are:
  • pinecones. You can find these at stores for very cheap at this time of year
  • 5 cotton balls that your child will love to shred into pieces
  • googley eyes
  • white and brown pipecleaners or felt for the wings and beak
  • Tacky glue
 For the fluffiest result, stuff the cotton pieces into each of the crevices on the pine cone.


Toilet Paper Roll Penguin


You will need glue, scissors, a toilet paper roll, black paint, white and black paper, yellow and/or orange foam sheet, and googley eyes. Here's how you can make this adorable craft:
  1. Paint the toilet paper roll black and let sit to dry.
  2. Cut out an oval out of white paper and paste it on as shown above.
  3. Paste on the googley eyes.
  4. Cut out a small triangle for the beak and larger triangles for the feet. You can use yellow, orange or mix it up and use both. Paste on as shown above.
  5. Cut out black spear shaped arms and paste one on each side. You can fold it in the middle of each arm to have them sticking out or paste them as they are pointing straight down.
  6. Let sit to dry! 
  7. Play with your penguin....
And my favorite......HAND AND FOOTPRINT CRAFTS


Multicultural Winter Inuit Craft and Winter Song

Here are some ideas to help introduce your children to the Inuit and their culture


Craft items you will need:
 
  • Paper plate
  • Light blue paint
  • Cotton balls
  • Glue
  • Black & red markers
  • Black crayon
Craft instructions:
Have the children paint the rim of the paper plate blue.
Let dry.
Next, have the children glue cotton balls all around the rim of the paper plate.
Let dry.
Then, using a black and red marker, have the draw a face in the middle of the paper plate.
Lastly, have the children add black hair all around the face.

 As a variation, you could use googly eyes,  yarn for hair etc.....

Books


Mama, Do You Love Me? written by Barbara M. Joosse is a lovely story to read to children about a parent’s love and the Arctic. 

 "Mama, do you love me? Yes I do Dear One. How much? In this universal story, a child tests the limits of independence and comfortingly learns that a parent's love is unconditional and everlasting. The story is made all the more captivating by its unusual Arctic setting. The lyrical text introduces young readers to a distinctively different culture, while at the same time showing that the special love that exists between parent and child transcends all boundaries of time and place. The story is beautifully complemented by graphically stunning illustrations that are filled with such exciting animals as whales, wolves, puffins, and sled dogs, and a carefully researched glossary provides additional information on Arctic life. "  From Amazon.com

Winter Song and Lyric


The Winter Song for kids is a fun way for children to learn about winter and the winter season.

Play


Lyrics

Wednesday, 11 December 2013

Christmas Fun for All Ages


 Felt Christmas Trees are fun to decorate


 Or how about some felt gingerbread men and ladies.

Paper plates are a great art supply

 Some matching fun 


Some creative ways to use paint chips and straws

                                             Who says you can't play with your food

                                                  A keepsake of your little ones fingerprint


Monday, 9 December 2013

Winter Wonderland Ornament


Winter Wonderland Ornament

What you'll need

  • 9-ounce clear plastic cup
  • Silver poster board
  • Pinking shears or decorative craft scissors
  • Polyester batting
  • Miniature trees (sold in craft stores; try the dollhouse or model railroad section)
  • Miniature animals or people (sold in craft stores or online at BJCRAFTSUPPLIES.COM)
  • 1-inch-wide mirror
  • Tacky glue
  • Fine glitter
  • Pushpin
  • Monofilament
  • Several craft beads

How to make it


  1. 1. Trace the rim of the cup onto the underside of the poster board. Cut out the circle, but stay at least 1/8 inch outside the trace line so the base will be slightly larger than the cup.


    2. Cut out a circle of batting snow that's the same diameter as the cup and set it atop the shiny side of the poster board circle.

    3. Separate or snip the batting where you'd like to position the trees, figurines, and mirror pond. Glue the base of each item to the poster board, then smooth or fluff the snow around them as needed. Sprinkle the scene with fine glitter.

    4.Use the pushpin to poke a hole in the center of the cup bottom. Thread a craft bead onto a 12-inch length of monofilament. Gather the ends together, letting the bead fall to the center of the line, and thread them up through the hole from inside the cup. String a few more beads onto the doubled line (outside the cup) and then knot the ends to form a loop.

    5.Apply a line of glue along the edge of the poster board circle. Press the cup, upside down, atop the glue and hold it in place for 20 seconds or so. During the first 10 minutes of drying time, occasionally check the seal and press down gently on the cup, if required. Let the glue cure for a full day before hanging the ornament.

Monday, 12 August 2013

To celebrate the return of summer.


How about celebrating the return of summer, because it's been a pretty wet one here in Alberta, with this simple sunshine plate craft!

Ingredients Needed

  • 1 - Small Paper Plate
  • 9" x 12" Yellow Construction Paper
  • Glue
  • Orange Collage Materials
  • Yellow Collage Materials

Instructions

  1. Glue collage materials onto the paper plate.
  2. Cut rectangle sun rays from construction paper.
  3. Glue rays onto the back side of the paper plate.

Thursday, 25 July 2013

Beach in a bottle.


This is a fun and easy craft to do after a trip to the beach.

Materials:

  • 1 small plastic drink bottle with cap (PET bottle)
  • sand
  • small shells or beads
  • funnel
  • blue paint or food coloring (optional)

Directions:

  1. Use a funnel to put some sand in the bottom of a cleaned out plastic bottle.
  2. Fill the the bottle with water.
  3. Drop in a few small shells or beads.
  4. Put in a few drops of blue food coloring to look like the ocean. (optional)
  5. Twist the cap on tightly.
  6. Shake and watch the sand settle to the bottom.
 Prep and Maintenance

If you use real beach sand instead of craft sand, you should wash the sand first. There are two ways:
1. Wash all the and beforehand in a big bucket.-hard
2. Put some sand in the bottle. Fill with water about halfway. Secure lid and shake vigorously. Unscrew lid and pour out water. repeat 3 or 4 times.-easy

Don't put too much sand, just enough to cover the bottom. If  you put too much, you won't be able to see the shells when they settle, they'll sink. The beads are a little lighter.


Materials:
  • 1 plastic drink bottle with screw on lid
  • water
  • cooking oil (the clearer the better)
  • blue food coloring

Directions:

  1. Fill the drink bottle about halfway with water and add a few drops of blue food coloring. Shake well.
  2. Fill the rest of the bottle with cooking oil and screw on the lid tightly.

The oil is lighter than the water and the two liquids won't mix. Shake it up and watch them separate. Tip to the side and watch the ocean roll. As simple as this craft is, it never ceases to amaze and entertain. For added effect, you could put a little sand at the bottom of the bottle, too. You don't have to limit yourself to just blue. Make a red lava bottle instead. Have fun!

Tuesday, 9 July 2013

Picnic food ideas!


With the sun shininh outside and temperatures rising, day home providers enjoy time outdoors and trips to the park for play and picnics.

Check out these ideas for some easy to make and different picnic foods.

(1) Cheese on sticks - Cut up cubes of cheese (marble or cheddar work best) and skewer with a pretzel stick. No cocktail sticks to clear up afterwards and prevents little hands grabbing handfuls of cheese cubes!

(2)Cheese parcels -
  • Puff pastry
  • Grated cheese
  • Fillings: grated carrot, courgette, chopped pepper, sweetcorn, ham etc 
Roll out the puff pastry, cut into squares and place some grated cheese with whatever else you want in the middle (I usually add some grated carrot or courgette to get a bit of veg in them, or a few strips of ham)
Fold up into triangles and press the edges together.
Put into the oven for 15 minutes at Gas 6 (200 C).

(3) Picnic roll ups - 
  • Soft tortillas/wraps
  • Fillings
Spread peanut butter, jam or honey on one side of a tortilla wrap.
Add mashed up or sliced banana and roll up tightly.
Of course you can include anything in your roll-ups as long as it's gooey enough to hold the roll up together. Here are some more ideas:
  • Chocolate spread and banana
  • Chocolate spread and strawberries
  • Cheese and pickle
  • Grated cheese, diced cucumber & mayonnaise
  • Ham & coleslaw
  • BLT
  • Mozzarella, tomato & basil
  • Greek salad & Greek yoghurt
  • Humous & grated carrot
  • Tuna mayonnaise
(4) Fruity kebobs -
  1. Thread the strawberries, cantaloupe, banana and apple pieces alternately onto skewers, placing at least 2 pieces of fruit on each skewer. Arrange the fruit skewers decoratively on a serving platter.
Enjoyyour picnics in the sun!

Tuesday, 18 June 2013

We're going on a worm hunt!


With the rain still pouring one of day homes this morning decided it was the perfect day for a worm hunt! Quite simply they were going out for a walk, in the rain, with buckets in hands to look at and collect worms!
It never seems to fail, kids are fascinated by these under gorund creatures and here in Alberta, the driest province in Canada, when the rain falls in June it's the best opportunity to see them!

Worm hunting, or any sort of bug hunting, is a great opportunity to introduce from an early age how important insects, bugs, worms, creepy crawlies, mini beasts are to our environment and to show them how to correctly handle and observe them.

Below are some tips for a successful bug hunt taken from the website; www.activekidsclub.com.

So get out your magnifying glass, a small container and get outside on a bug hunt!

tips about bug hunting:Let children discover insects themselves. Make sure you teach them about bugs that can hurt them. Because children are closer to ground level they will probably discover them before you.
You can help them by turning over rocks and tree branches so they can see all the life just out of sight. You can teach your child about the different types of insects and the function they have in the nature.

Smart materials to bring with you on a bug hunt are: jar, magnifying glass, plastic tweezers, sketchbook, pencils and books about insects.

Bring a jar for collecting insects; remember to make holes in the lid. Make a habitat for the bugs, put soil, leaves (from the place you found them) in the jar and some water. Make sure you remember to set you new friends free after a day, put them in the same place you found them.

Inspect bugs with a magnifying glass; discuss with the kids what you see. Consult the books about the bug’s secrets.

Make art of the findings, let the kids draw bugs how they see them.

Thursday, 13 June 2013

Dad Rocks salt dough paperweight.


Dads play an important part in our children’s lives. What better way to celebrate him than by having the kids make a special gift. This fun paperweight only requires small rocks and simple ingredients from your kitchen. He’ll love the results and cherish it always.


Supplies:
1/4 cup salt
1/2 cup flour
1/4 cup water
bowl
cookie sheet
1/2 cup pea gravel

Instructions:
Preheat oven to 250 degrees F.
Mix flour, salt and water together in a bowl. If dough is too sticky add small amounts of flour until it is doughy and pliable. Be careful not to add too much as the dough will dry out and your creation will crack.
Shape a piece of the dough into a ball in your hands. Place the ball on the cookie sheet and flatten to about 1/2″ thickness.
Carefully select pieces of pea gravel to spell out “DAD ROCKS”. Press them firmly but gently into the salt dough. (For younger children you may want to mark this out first or just shorten to Dad)
Bake your paperweight for 2-2.5 hours until completely dry.
Remove from oven and allow to cool before handling or removing from cookie sheet.

Optional: You can spray your creation with acrylic sealer or paint it with a clear coat sealer.

Monday, 3 June 2013

Rainy day website.

With the rain still persisting in falling, looking for new ideas and activities to keep the kids busy and occupied becomes a priority!

Check out this website for 101 + ideas for rainy day activities, both indoors and outdoors!

 www.rainydaymum.co.uk

Ideas and links from a Mum who lives in a country where rain can often stop play!

Our particular favourites are painting with rain drops and making mud soup!

Wednesday, 29 May 2013

Paper plate matching puzzle.


Such a simple and easy to make matching puzzle!

Simply cut up a decorated paper plate, this could be a store bought one or one that the children have decorated, to make an instant puzzle.

You could be creative with how many pieces you cut, shapes or the way you cut it.

Needless to say it's an activity the kids will enjoy!

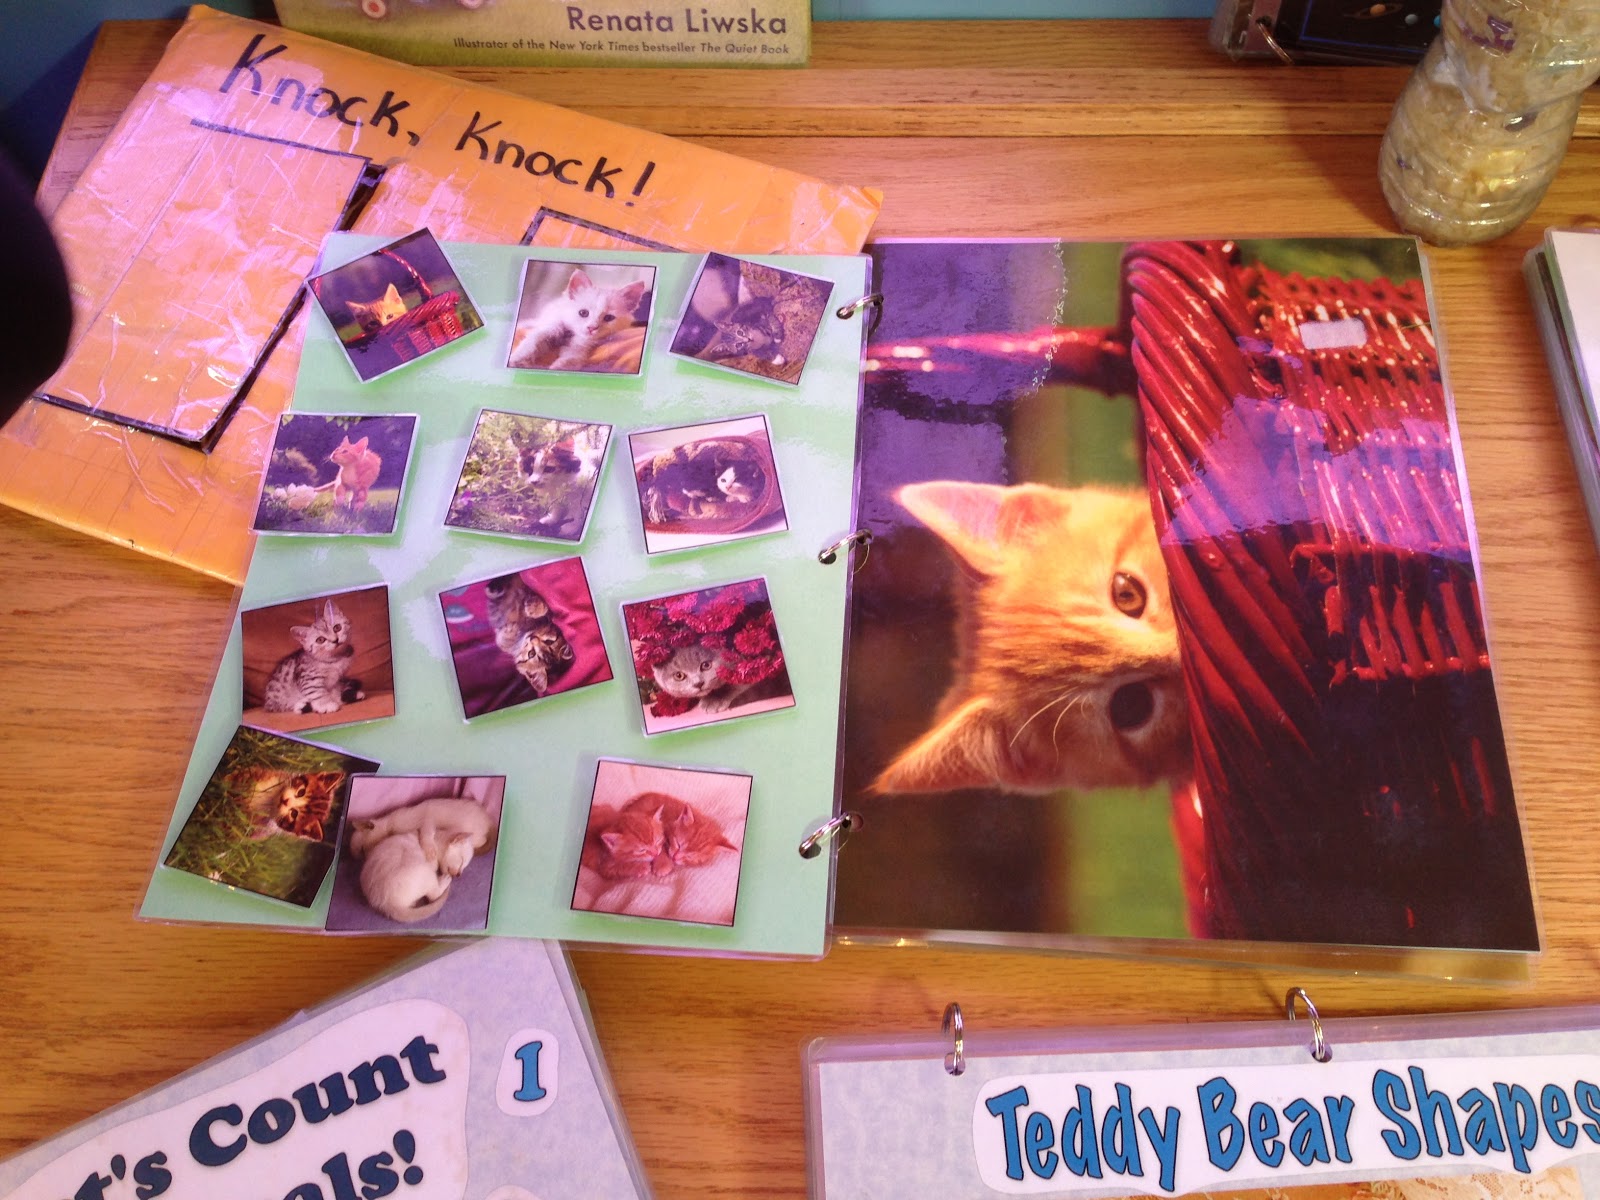
Matching books.


Ever wondered what to do with those old or free calendars?

Well here is a great idea see at a recent COW (classroom on wheels) event that recycles the calendar into an early literacy development activity.

Simply laminate or sticky tack each picture, as shown above. Then cut out the matching small pictures for each month, laminate or sticky tack these also.

Attach to each small picture some velcro to attach each picture to the front page. Also attach a piece of velcro to each main picture.

Put all pages together as a book and attached using some rings, the sort you may find on a key chain would suffice.

The children can then explore the book and match the smaller picture to the larger one.

Matching puzzle.


How many times have you used a puzzle like this where you have to match two objects together?

These matching puzzles are a great way to encourage the development of early reading skills.

A different approach to using this puzzle though is to have all the pieces attached to a vertical surface such as a wall, door, easel etc rather than on a horizontal surface such as a table or the floor.

In the photo above, magnetic tape has been attached to the back of each puzzle piece to stick it to the magnetic surface!

Wednesday, 8 May 2013

More Mothers Day flowers.


A quick and simple Mother's Day craft that any Mom from your day home will love and treasure.


Instructions

  1. Cut out the flower pot from construction paper.
  2. Cut green construction paper into 1" strips.
  3. Glue three strips onto the backside of the flower pot.
  4. Paint hands and create three handprints on white construction paper.
This idea and many others can be found at www.childcaresoup.com.

Monday, 6 May 2013

Mother's Day.

With Mother's Day coming up this weekend our day homes are busy creating personal crafts that will be long treasured by the Mom's of the children they care for.

This craft was observed at one of our day homes and was done with children from 1 years old and up (although the amount of help needed differred!!)


  1. Simply start by making a hand print in the middle of the page.
  2. The children can then add flower shapes or stickers to the end of the fingers.
  3. Finally, cut out (or pre cut for younger children) a flower pot shape and glue underneath hand.
  4. A nice touch is to personalize the card with the words "I love my Mom because....." and then ask each child for a suggestion for their Mom.