Monday 22 October 2012

Halloween painting fun for toddlers!

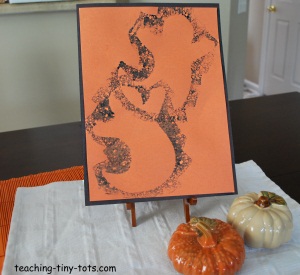
ghost sponge painting

Make a cute Halloween to picture to hang or give to someone special.


MATERIALS
  • White, Orange or Black Construction paper

  • Ghost stencil (or other halloween character) 

  • Sponge
  • Paper Plate or small plastic palette for paint

  • Paint Brush
  • Tempera paint (white, black, orange or purple)

  • Masking tape
  • OTHER MATERIALS
  • Scissors

  • Newspaper to work on

  • Art smock or old shirt
  • STEPS
    1. Select a stencil of your choice. Make your own, find foam shapes at a craft supply store or educational stores have holiday stencils.

    2. Cut your stencil using construction paper.

    3. Select the color paint you want to use and then select a contrasting color of construction paper Black with white, orange with black, purple with white or orange are great combinations.

    4. Make a loop with a piece of masking tape and adhere your stencil to the paper.
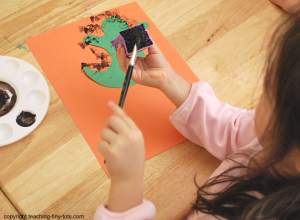
      how to put paint on sponge
    5. Cut out a square or rectangular piece of sponge as shown in photo. The rectangular shape made it easy to hold.

    6. Put paint on the palette. Dip sponge into paint lightly or use a brush to apply.

    7. Gently stamp along all the edges of your stencil.

    8. Gently lift stencil and place in another location.

    9. Repeat if desired.

    10. Let dry.

    11. Frame or mat onto another construction paper for a nice effect.

    TIPS AND SUGGESTIONS

  • Practice on a piece of newspaper or scrap paper first to show your child how to print without pressing to hard.

  • For young toddlers, apply paint for them onto the sponge.

  • For older toddlers, let them dip into the paint or use a paint brush to apply. The paint brush minimizes excess paint.

  • EDUCATIONAL TIPS

  • Read a Halloween story and talk about different Halloween characters or things that represent Halloween.
  • This great idea and other activity ideas for toddlers can be found on www.teaching-tiny-tots.com

    Another useful blog to check out!

    Looking for some inspiration?

    Then check out this blog, that has been tried and tested by a fellow provider, as a valuable resource for activity ideas.

    www.playathomemom3.blogspot.ca

    The blog has activities used by Moms with their own children at home and shows great step by step instructions with lots of photographs.

    On the left hand side is a list of different themed activities for you to explore!

    Monday 15 October 2012

    It's a spooky time of year!

    The shops are full of costumes, spooky decorations and massive boxes of candy and the kids are already excited about Halloween! It's a great time of year to have an entire themed day of dressing up, turning your play room into a haunted house, eating spooky snacks and just generally having fun!

    Below are some ideas that will help you plan your spooky fun with something that we all have hanging around our home ....... toilet rolls!


     Such a simple idea!


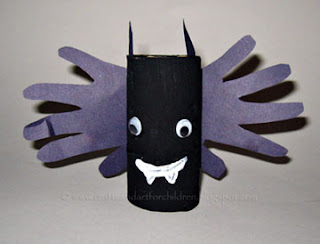
    Here's a cute Halloween bat made from a toilet roll with handprint wings.

    Materials:
    • toilet roll
    • black an white paint
    • black and purple construction paper
    • scissors
    • glue
    • google eyes

    Directions:
    1. Paint the toilet roll black or completely cover in black paper.
    2. Trace hands on purple paper and cut out.
    3. Glue hand prints to the back of the toilet roll for wings.
    4. Cut little triangles from black paper and and glue on the top for ears.
    5. Glue on 2 google eyes.
    6. draw a mouth and teeth with white paint or white out.


    You can make your own collection of these Halloween toilet roll monsters. All you need are toilet paper rolls, a few decorating materials and imagination.

    Materials:
    • toilet paper rolls
    • black, orange, green, and white paint
    • crepe paper streamers(white and green)
    • scissors
    • glue
    • google eyes
    • black marker
    • mini marshmallows(for Frankenstein's electrodes)
    • black construction paper(for the bat, not pictured)

    Directions:

    Ghost
    1. Paint the toilet roll all white.
    2. Draw eyes and mouth with a marker

    Jack-O-Lantern
    1. Paint all orange.
    2. Draw a face.
    3. Stuff some green crepe paper inside for the stem.

    Frankenstein
    1. Paint the top black and the rest green.
    2. Cut slits at the top for spiky hair.
    3. Draw mouth or scar.
    4. Glue on google eyes.
    5. Glue on mini-marshmallows for electrodes.

    Mummy
    1. Cover toilet roll in glue and wrap in white crepe paper.
    2. Glue on eyes.

    Bat
    1. Paint all black.
    2. Cut out 2 simple wings from black paper and glue on.
    3. Glue on google eyes.


    All the above ideas and more can be found on www.easypreschoolcraft.blogspot.ca

    Wednesday 10 October 2012

    Another great website to check out!

    Check out this great and easy to use website;

    www.preschoolexpress.com

    It's full of ideas on various themes and every month produces an activity calendar for toddler and pre school activity ideas! A useful tool for those weeks when the ideas are not exactly flowing!!

    Tuesday 2 October 2012

    A quick, easy and simple thanksgiving craft!

    Just imagine how great this rainbow handprint turkey would look on a thanksgiving card from your day home children to their parents! Also a great kepsake of how quickly those little hands grow!


    This Thanksgiving Day rainbow turkey handprint craft is beautiful and easy to make.

    Materials:

    • rainbow colored paints
    • paintbrushes
    • white paper
    • black marker

    Directions:
    1. Paint child's palm green, thumb red, bottom of the fingers yellow, and tops of the fingers light and dark blue.
    2. Press hand onto white paper. Add a pink finger print for the beak and waddle. Allow to dry.
    3. Draw simple legs and an eye with a black marker.
    This great idea was found on the simple crafts for prechoolers blog previously mentioned on this blog! Check it out for many other great thanksgiving ideas!